It’s here! Roasted: the Homebrewer’s Guide to Home Roasting Grain written by yours truly ( Click Here for the Amazon Kindle Version)! It’s available as an Ebook Download through Amazon for only $2.99. The book covers a lot of the information contained in my posts, but also has additional information on base malts, and reading a malt analysis sheet. It’s not the longest book, but it doesn’t have to be. There are plenty of books that cover how to brew and brewing science. This book focuses solely on the art of home roasting grain for beer. If you don’t have an Ereader, CLICK HERE to download the PC version of the Kindle App. You can then read the book on your PC.
 In this post I will be working on a specialty malt called Special B. In order to do this, researching the best base malt to create your homemade version of any special malt is very important. I turn to malt datasheets, along with the special malt flavor andaroma profile to hel develop what I want this malt to taste like. To research and develop your malts, you are going to want access to datasheets. I use a lot of Briess products so I refer to the data sheets on their website often to get color and basic flavor profiles. You can find these here, if you only want to see an example of a data sheet, click here for a data sheet on standard 2 row. Mostly what I get from these sheets is the color, the type of roast, and general flavor profile. I can’t really control much else. (Just an FYI, I have a part 3 in this series as well, you can view that HERE.)
The major draw for me in making my own specialty and roasted malts is that it adds another depth of homemade flare to my homebrew. The downfall is that unlike commercial malts, you don’t usually end up with the consistency of the commercial product. If you can overcome that hurdle, home roasting your malts can become addicting. But let’s be honest. As homebrewers we tend to be quite anal about consistency. From mash temps to alpha acids to fermentation temperatures. Any minor change in a process or recipe can give you an entirely different beer. You can produce consistent malts at home, but you also need to be OK with minor differences from time to time. Also, because I use an oven and a nut roaster, doesn’t mean that is the only method of roasting. You can try coffee roasters, a grill, or whatever else you think may produce the result you are looking for. With all that out of the way, let’s look at my first run at making Special B.
First I had to look at what Special B is like. Special B is an An extremely dark caramel malt with a sharp, almost toffee like flavor. It should have a heavy caramel taste and is often credited with the raisin-like flavors of some Belgian ales. It is also 147 degrees Lovibond. Since special B is a Belgian Malt, I chose to use Belgian Pale Ale Malt as my base. Since it is essentially a very dark caramel malt, I decided to take that Belgian pale ale malt and simply use my caramel malt process to make the grain. Originally I was going to roast at 400 degrees in the oven to get the dark color, but as you will see in the pictures later, after drying, the grain darkened enough that I reduced the roast time and temp from 400 degrees for 40 minutes in my plan, to 300 degrees for 30 minutes. As you can see, you should plan prior to making a specific malt. you can also just wing it and experiment with creating your own malts. During my Special B project, I also wanted to make a very very dark caramelized Munich malt. You will see pictures of that during this post as well. That is why I wanted to mention it. Making this grain was just for fun and not based on anything in particular.
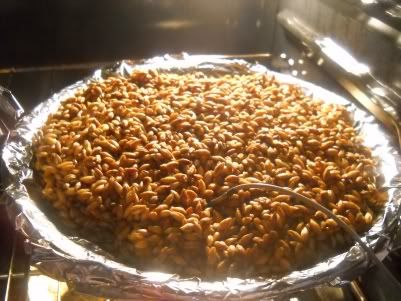
I started out Special B by taking a pound of Belgian Pale Ale Malt and soaking it for 4 hours. Once the grain is all soft, it is time to start “mashing” it in the husk. I bring my stove up to 180 degrees and place a thermometer in the grain. It is important to make sure the grain is kept in a thick pile to prevent it from drying out. You can even keep a little water in the bottom of the pan and stir often during the mash to make sure the grain always stays wet. After about 2 hours (which is how long I mashed this batch) then you are going to want to transfer the grain to a flat cookie sheet or shallow jelly roll pan for drying.

I mash the grain in a cake pan lined with tin foil. This ensures that if there was any oils on the pan do not get on the grains

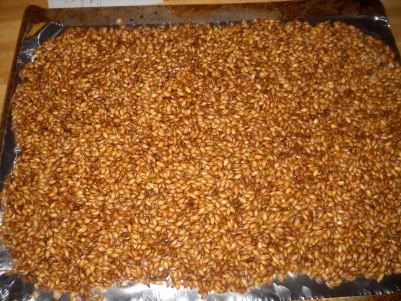
Drying the grain on a large cookie sheet. For drying, make sure you keep the grains spread as thin as possible.
When drying, you do not want to roast the grain yet. If you have a food dehydrator, you may be able to use that but I wonder if it would take too long. I dry in the oven at 250 degrees and stir the grain often. It usually takes about 3 hours (sometimes more) to dry the grain. Once the grain is dry, you can then start the roasting process. If you have a specific malt in mind, you may or may not have to adjust the roast based on how far along the grain came during drying. This happened to me on the Special B Project and I adjusted my process to what looked to me like it needed 300 degrees for 30 minutes instead of 400 at 40, which a general roast of already dry grains will get you into that 145 degree lovibond range. This case, the grain already darkened a bit during the drying process.
Below is a picture of when i should have stopped roasting my Special B. I pulled the grain out 20 minutes into the roast for another stir and it looked to be right on. I took a picture of it, in case my extra 10 minutes made a drastic change int he grain. While it did not make a drastic change, it did bring the grain in a shade darker than it should be.

Special B, 20 minutes into the 300 degree roast
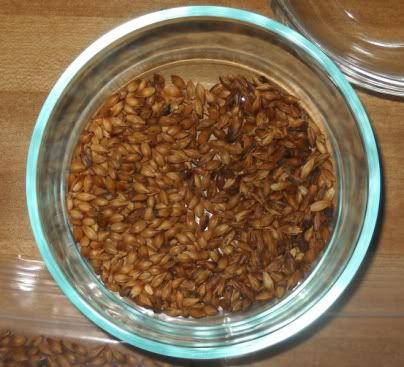
After the full 30 minutes was up, you can see that my first run at Special B brought in the grain a bit darker than it should have been. However, the taste is very close. As a matter of fact when I placed a small bit of each grain in each side of my mouth, the difference was very slight. My version has a little more of a roasted flavor, but both seemed equally as sweet and had very similar flavor profiles. Below is a side by side of commercial Special B and my home made version, I placed some Special B in the bowl on the left half and my home made version on the right half of the bowl. I had a few more darkened grains than what you see in the commercial version as you can see. I really wish I would have stopped at 20 minutes.

Side by Side of commercial Special B and my version
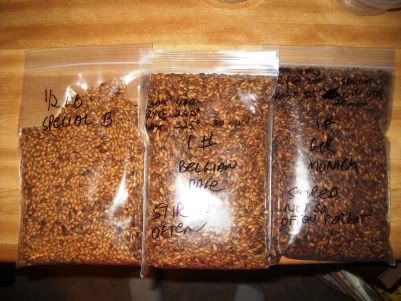
So all in all, here was the grains I made that day. The commercial Special B is on the left, then my version in the middle, and a dark roasted caramel Munich malt on the far right.

Home Roasted grains.
So Below is my recommended process for making homemade Special B.
Soak 1 Pound of Belgian Pale Ale malt for 4 hours in filtered water. Place the malt in a cake pan (or pour the grain into a pile) the place in a 180-200 degree oven for 2 hours. Monitor the grain, and if the grain temp gets above 160 degrees turn off the oven for a while. Keep the grain in that 150 degree range for 2 hours, stirring often (about every 15 minutes). Once the mash is done, spread the grain into the thin layer and dry in the oven at 250 degrees, again stirring often. Once the grain is dry, based on the finished color, ramp up the oven to 300 degrees and roast for 20 minutes (or when the grain looks done). Let it rest for 2 weeks before using in a beer.
Dark Caramelized Munich Malt
Soak 1 Pound of German Munich Malt for 4 hours in filtered water. Place the malt in a cake pan (or pour the grain into a pile) the place in a 180-200 degree oven for 2 hours. Monitor the grain, and if the grain temp gets above 160 degrees turn off the oven for a while. Keep the grain in that 150 degree range for 2 hours, stirring often (about every 15 minutes). Once the mash is done, spread the grain into the thin layer and dry in the oven at 250 degrees, again stirring often. Once the grain is dry, ramp up the oven to 325 degrees and roast for 25 minutes (or when the grain looks done, but not burned). Let it rest for 2 weeks before using in a beer.
Have fun, and Experiment!
Is it important to use filtered water when making caramel malt? Can I just use tap water? You could, but municipal water tends to have either chlorine or chloromine in it. These will get into your grain and could cause some off flavors in the final product. For piece of mind, I’d stick with filtered or bottled water. If you must use tap water, I would let it sit overnight before using it. This will help if your water utility uses chlorine, but will do nothing for the chloromine.


